Learn how to prime and paint a mantel as part of a fireplace makeover, and when and why you should use primer in a renovation project. Plus, our tried and true tips for getting a great paint finish using primer.
Thank you to Kilz for sponsoring this post, we have used your products for years and love them. All opinions are our own! Read our full sponsorship and affiliate disclosure policy here.
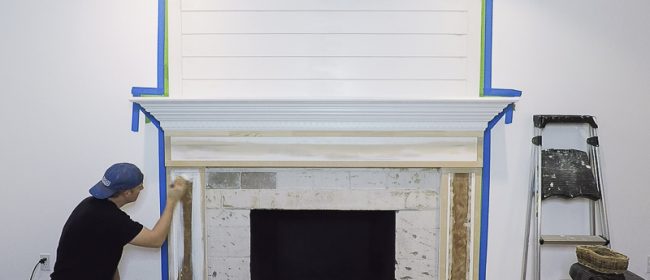
But we didn’t just jump into painting it gray right away and it helped me know for sure that the decision to paint it gray was the right one. To start off, one of the most important things we did was prime the fireplace with stain blocking Kilz3 paint.
After putting up the new molding, with wood scraps that had never been painted, plus exposing old stained wood and patching with a wood colored filler, we knew from experience that priming was definitely a critical step. I should also let you in on a secret, when it comes to projects in our house, I would rather do everything ONCE the right way… and NOT twice. Which is one of the reasons I’m very happy to wait with something unfinished, until I am sure that I know exactly what I want to do with it. Then we try to do it the right way, all the way. Just to clarify- since I’ve been remodeling one house or another for literally the last 18 years, whenever I have been impatient and just jumped into a project- skipping steps, I have always ended up disappointed. So, because this fireplace is the main focal point of the room, we started with primer- just don’t skip this step! And you won’t be forced to regret all the extra work, of stripping, sanding, PRIMING and painting again- you’re welcome!
Priming and Painting a Fireplace Mantel with Kilz
You may be asking, what does Kilz primer do? I know I mentioned this earlier, but over the years we have done TONS of projects, and we have realized that it is not worth skipping steps. There is nothing worse than painting a wall and having the paint bubble, or stains come through… ask us how we know. So now, whenever we are working on a project with new wood, plaster, previous crazy colors or unknown finish — we prime!
Tools and Supplies:
Tips for Priming and Painting:
How we painted our Mantel:
Priming and painting is ultimately very easy and luckily a fast project!
Obviously we started with primer. In order to have a nice clean and smooth finish I started painting light thin coats, feathering the edges into the corners of the molding on the fireplace using the 2″ brush. After I felt it had a decent coverage, I transitioned to using the foam roller (the dense foam rollers with a curved, rounded foam edge with helps for getting into corners). I then rolled a light coat of paint onto the previously brushed on portions to smooth any brush marks for a nice, mark free, finish. Continue to work in small controlled sections to avoid hard dried out lines, drips or lumps before you can smooth them with the roller. Finish painting the rest of your project following these simple steps and the tips above. Always, remember to wash your brushes and rollers between coats.
After an hour of drying time, when you are sure no stains are coming through, you may add the final coat of paint.
Painting the Gray!
It doesn’t take long after you prime before you will be able to paint on the final coat. According to the label instructions you don’t have to wait long after painting Kilz primer. The paint is dry to the touch within 30 minutes, but you need to wait an hour before the next coat.
First, I want to put this out there: if you haven’t tried Complete Coat by Kilz, it is worth giving it a try! We were very pleased with the coverage and quality of the paint and even happier with the price, only $20 bucks at Walmart!! This is a screaming deal for paint!! If you are on a budget a great price on paint can really make a difference, so be sure to give it a try.
We decided to go with a flat sheen for the fireplace and I am SO glad we did. We love how if gives the mantel a suede like finish. It reminds me of a chalk paint, it just feels so rich, somehow, without the shine.
I was really pleased with how well the Kilz Complete Coat painted on. We could have gotten away with just one coat, but because we put in on in thin layers, we decided to do two coats.
And here is how the mantel looks now that it is painted.
We are seriously so pleased with the finish!! We literally had a friend stop by just today and she was so taken with the fireplace and noticed it without any prompting from us, and especially loved the color! YAY!
Here is a sneak peek of the fireplace with the stone in place! We can’t wait to show you how to install the stone and show you the staged final mantel!
Okay one more… Squeal! Don’t forget to come back next week to see the tutorial for installing the stone!
About Cassity
Cassity started Remodelaholic with her husband, Justin, to share their love for knocking out walls together. She is an interior designer, wife, and mother of two. She and Justin have remodeled three homes from top to bottom and are working on their fourth. Making a house a home is her favorite hobby.
This content was originally published here.