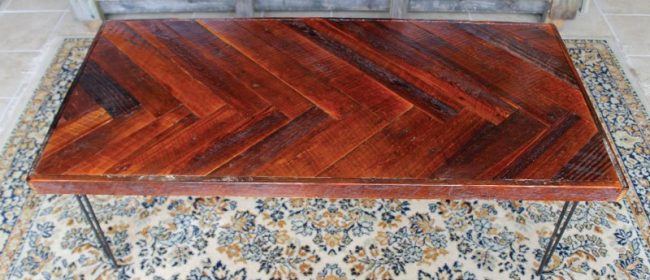
Would you love to have a beautiful reclaimed wood coffee table that can be built in 5 easy steps? This herringbone pattern table with hairpin legs is the project for you! Using plywood and wood planks, this plan is simple and affordable!
Hi Remodelaholics! It’s LZ from The Summery Umbrella, and I’m super pumped about this new project today!
I’ve created projects out of reclaimed wood like this beautiful Mason Jar Pendant Light as well as my stunning Potting Bench.
Today is going to be ANOTHER gorgeous and stunning reclaimed wood project! You can most definitely accomplish this cutie putie with just about any kind of wood, but since my husband and I have a lot of barn wood on hand, it’s our go-to solution.
How to Build a Wood Herringbone Coffee Table
by LZ from The Summery Umbrella
Step #1: Gather the Materials
Materials Used:
This post may contains some affiliate links. Please see our full privacy policy and disclosure here.
Tools Suggested:
Step #2: Cut the plywood base and rip your reclaimed boards (or new boards) to desired width
Rip your barn wood to 3.5″ strips (or just use 1″x4″).
Step #3: Mark a starting point and attach reclaimed wood to base plywood
Mark the starting point with a square on your base. We chose to offset ours to be a little different, but a very common herringbone pattern is centered.
Apply glue to the underside of your barn wood boards and position along the marked line. From the underside, secure into place with 1″ brad nails (make sure to overlap the edge–you’ll cut off the extra in just a second).
Butt the edge of the next board up to the first board checking for square. The first boards and their placement are the most important as they will provide the outline for the rest of the project.
Continue the pattern the entire length of your table. As we worked our way down we trimmed the larger lengths off so we could use the scraps to fill the smaller places on the ends. This was done with a circular saw.
Trim all edges flush to the plywood underneath. This can also be done with the handheld circular saw as well.
Next, using a table saw or circular saw cut your wood into 2″ strips for trim.
Tip: Instead of measuring your pieces put the trim piece in place and simply mark where to cut.
Apply the trim to the sides with glue and 1 1/4″ brad nails.
Step #4: Sand the Table and Apply Protective Coat
To finish we lightly sanded the entire table with 60 grit sandpaper, which was mainly to knock down the splinters. Then applied Spar Urethane to add a beautifully shiny protective coat. On barn wood we used four coats of the spar varnish. This particular finishing product is great for old dry wood as it flexes with the wood.
Step #5: Attach the Legs to the Tabletop
Add your hairpin legs! The set that we purchased was ridiculously easy to install as you can see in the below picture. If you would like to pre-drill your screws you most definitely can, but I did not think it was necessary.
And thats it!
Plus, with this table not only is the top simply amazing and will definitely need to be shown off, but you can also add layers of your favorite vintage finds to add an interesting element to it as well. The sky is limit with decorating ideas with this table!
Cost and Time Involved:
Hairpin Legs: $50
Spar Varnish: $32
Total Cost: $82
Total Time: You could easily do this project in two days if you have all of your supplies on hand. It’s approximately 4 hours to build your table and add your first coat of varnish. Subsequent coats will add extra drying time.
I hope you enjoyed reading this tutorial and happy building,
If you love it like we do, please pin it or share it on Facebook!
About LZ
Hi! I’m LZ, and I am the owner of The Summery Umbrella shop and blog. I love being creative in any form that it takes (writing, painting, DIY, food, etc), and find a hard time sitting still.
This content was originally published here.